

Streamlined Software Deployment: Mastering CI/CD with Jenkins, SonarQube, Nexus, and Slack.


In the realm of software development, the ability to adapt and evolve with rapid technological changes is what separates the industry leaders from the followers. This blog post introduces an innovative project that embodies the principles of DevOps: a CI/CD pipeline utilizing Jenkins, SonarQube, Nexus, and Slack. Our focus is on automation, agility, and reliability, addressing common hurdles such as frequent code changes and the need for prompt bug fixes.
Architecting for Agility: The CI/CD Blueprint
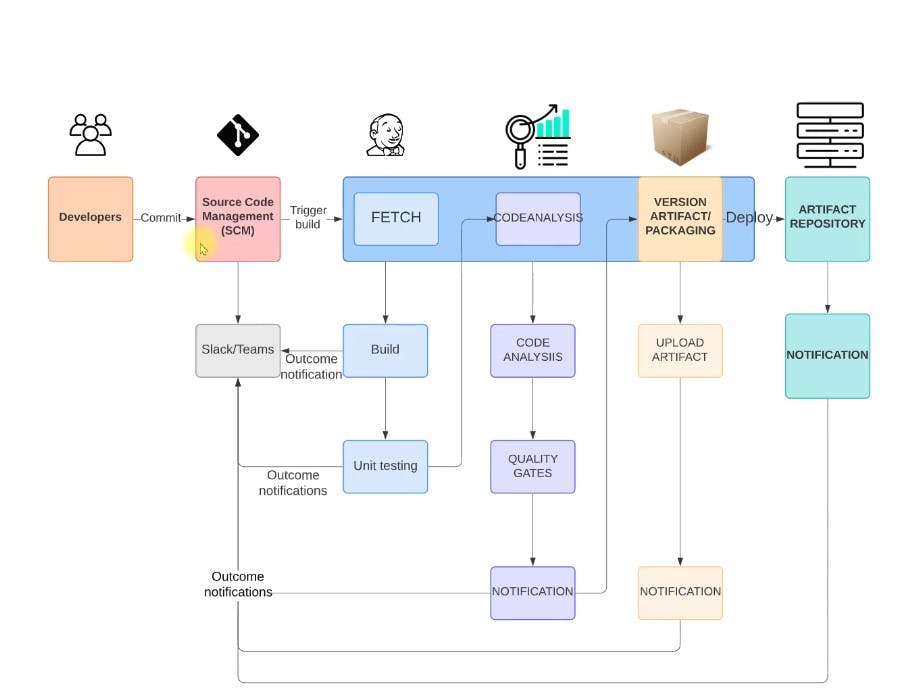
Diving into the architecture of our CI/CD pipeline, we begin with the developer's commit to GitHub, which acts as a trigger for the Jenkins automation server. Jenkins, our orchestration maestro, fetches the latest code and kicks off the process that forms the backbone of our development lifecycle.
The code is then pushed through a series of automated stages—testing via tools like JUnit and Checkstyle via Sonnarscanner to ensure functionality, followed by code analysis with SonarQube, where it’s evaluated against rigorous quality standards. Each step is a checkpoint, and at every stage, we are notified through Slack, keeping our team in the loop continuously.
If a build fails, the team is immediately alerted to address any issues, streamlining the process of bug identification and resolution. Successful builds proceed to Maven for packaging, after which artifacts are securely stored in the Nexus repository, ready for deployment.
This is more than just a pipeline; it's a robust ecosystem, designed to be resilient and responsive. The visual diagrams serve as a testament to the system's clarity and its ability to isolate faults, minimize downtime, and adapt swiftly to the developers' needs.
The Essentials of Our CI/CD Process
In building our pipeline, we’ve got a lineup of tools that streamline our development from start to finish:
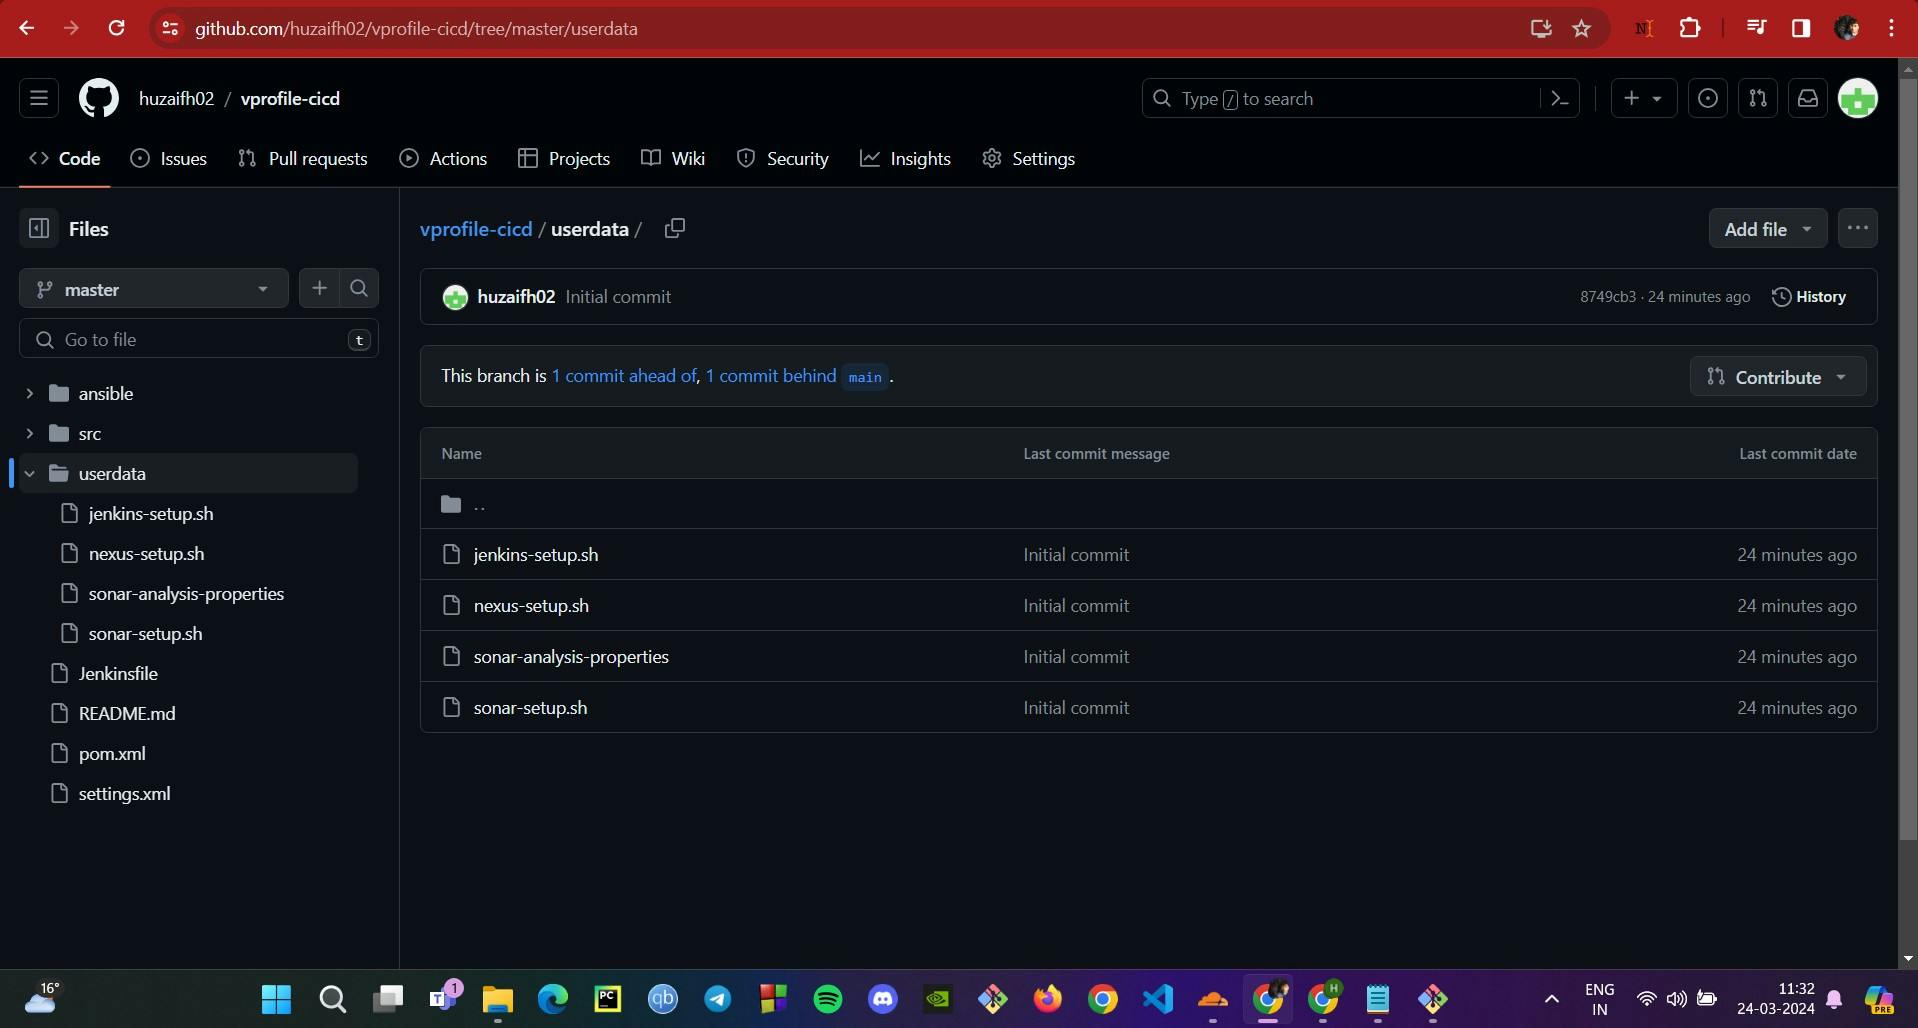
GitHub: It’s where all our code starts out and where any changes trigger our pipeline to kick into action. You can find my source code at: [https://github.com/huzaifh02/vprofile-cicd/tree/master].
Maven: A build tool that automates the creation of our software product, handling everything from compiling the code to packaging it up.
Checkstyle: This tool checks our code for any style issues, making sure everything is in order before we move on.
Slack: Keeps our team in the loop by sending out alerts about the status of our builds, so we all know what’s happening as it happens.
Nexus: A repository where we keep all our build artifacts safe and sound, ready for when we need them.
SonarQube: It’s our code analysis server that looks through the code for any bugs or vulnerabilities to keep our quality top-notch.
AWS EC2: The home for our Jenkins, SonarQube, and Nexus servers, giving us a reliable and scalable cloud environment to work in.
With these tools, each commit is built, tested, and deployed efficiently, keeping our process smooth and speedy. Now, let’s dive into how we put all these pieces together.
Step 1: Setting Up the Foundation with Security Groups and Key Pairs
To ensure a secure CI/CD pipeline, we start by establishing robust security measures with AWS security groups and SSH key pairs.
SSH Key Pair: We generate a
.pemkey file for SSH access. This key is our doorman, making sure only authorized personnel can SSH into our servers.Jenkins SG: We create a Jenkins Security Group (SG) with specific inbound rules: port 22 is open to my IP for SSH access, and port 8080 is open for both IPv4 and IPv6, setting the stage for GitHub webhooks to communicate through the internet.
Nexus SG: For Nexus, we set up another SG with port 22 open for SSH from my IP and port 8081 open from my IP and the Jenkins SG for internal traffic.
SonarQube SG: Similar to Nexus, the SonarQube SG has port 22 for SSH and port 80 for web traffic from my IP and Jenkins SG.
After setting up these groups, we go back to the Jenkins SG to add an inbound rule: port 8080 from the SonarQube SG. This ensures that SonarQube can talk to Jenkins, finalizing the communication paths within our CI/CD ecosystem.
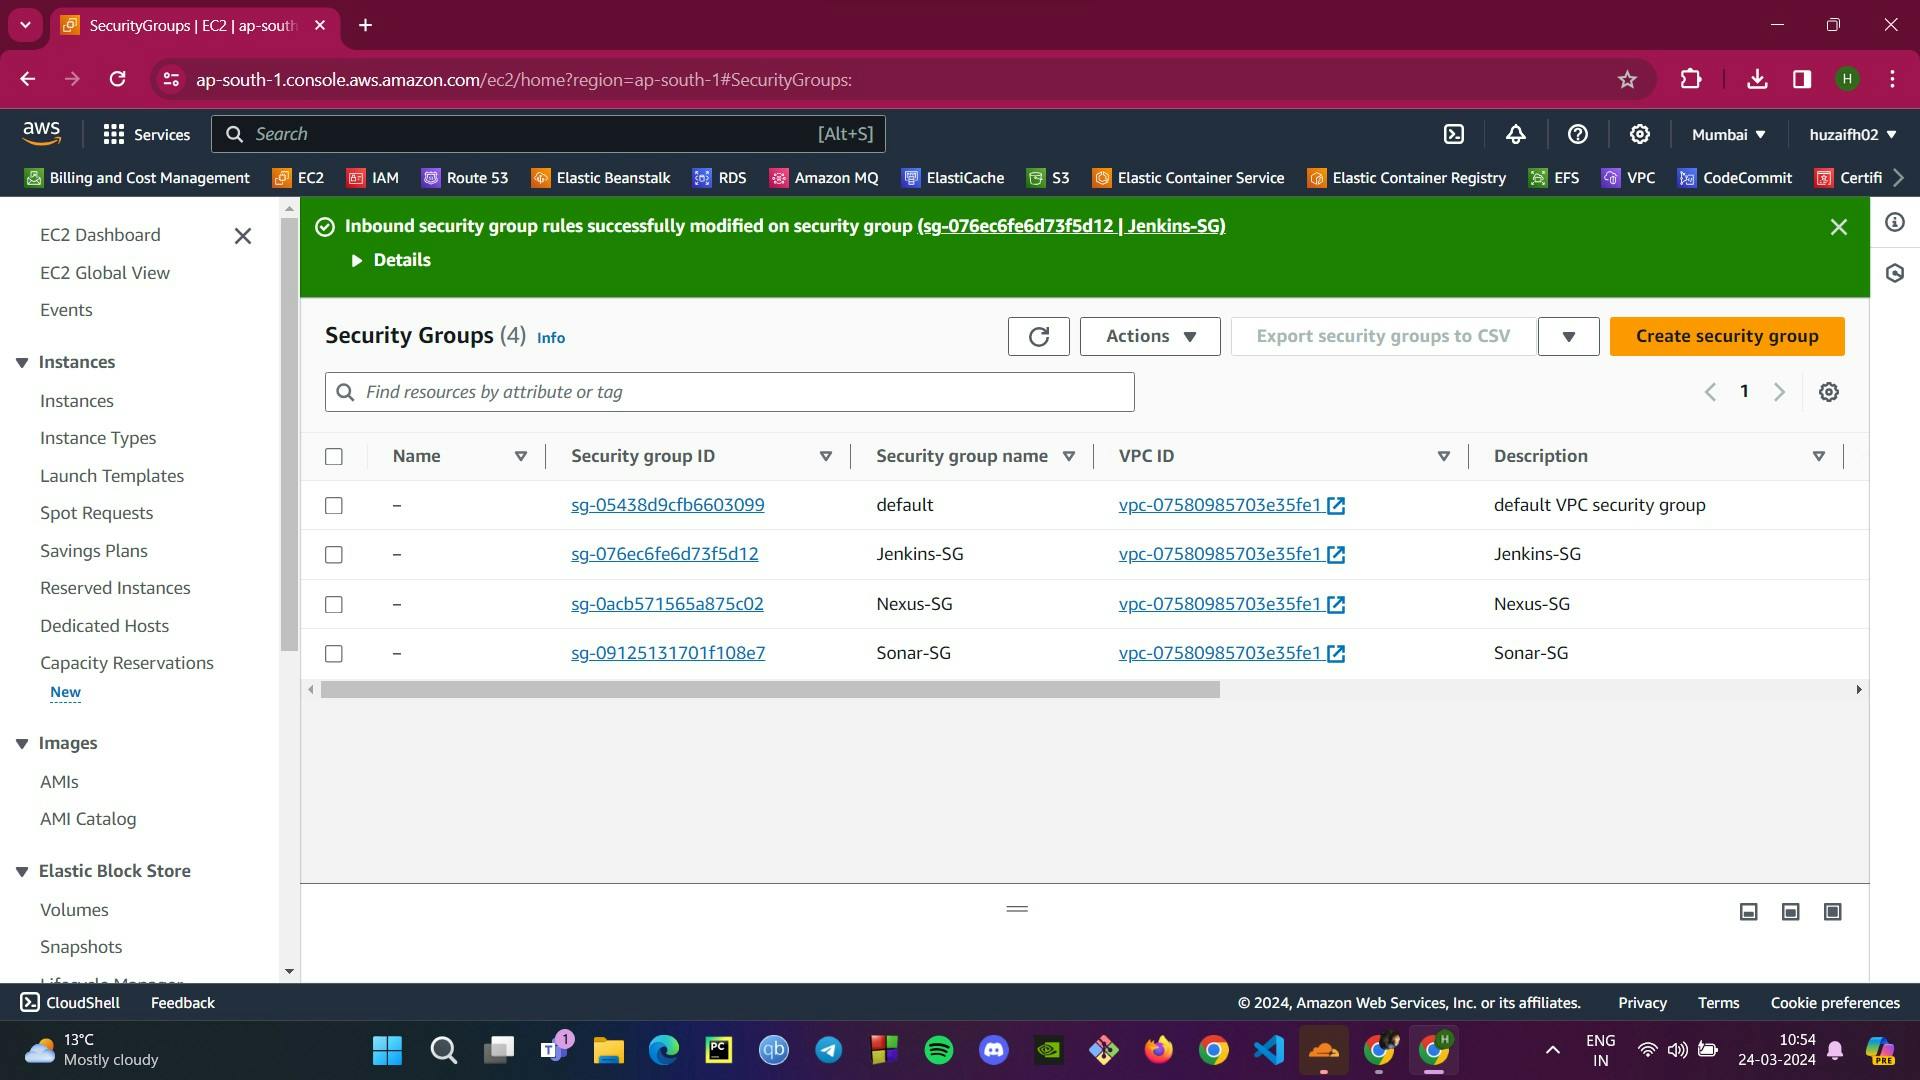
The image provided gives a glimpse into the security groups section of the AWS console, where we can see these groups listed and ready for action.
With these safeguards in place, we're not just secure; we're set up for the automated and smooth operation of our CI/CD pipeline. Next, we’ll discuss how each service is installed and configured on their respective EC2 instances.
Step 2: Provisioning Servers on EC2 and Post-Installation Setup
After securing our virtual space with the necessary security groups, we proceed to establish our server environment on EC2, ensuring each tool in our CI/CD pipeline has a solid foundation.
EC2 Setup: With the help of our GitHub repository, we utilize bash scripts within the
userdatadirectory to automate the provisioning of our EC2 instances. Each tool gets its dedicated server:Jenkins Server: We set up Jenkins on an Ubuntu 22 server using a t2.small instance.
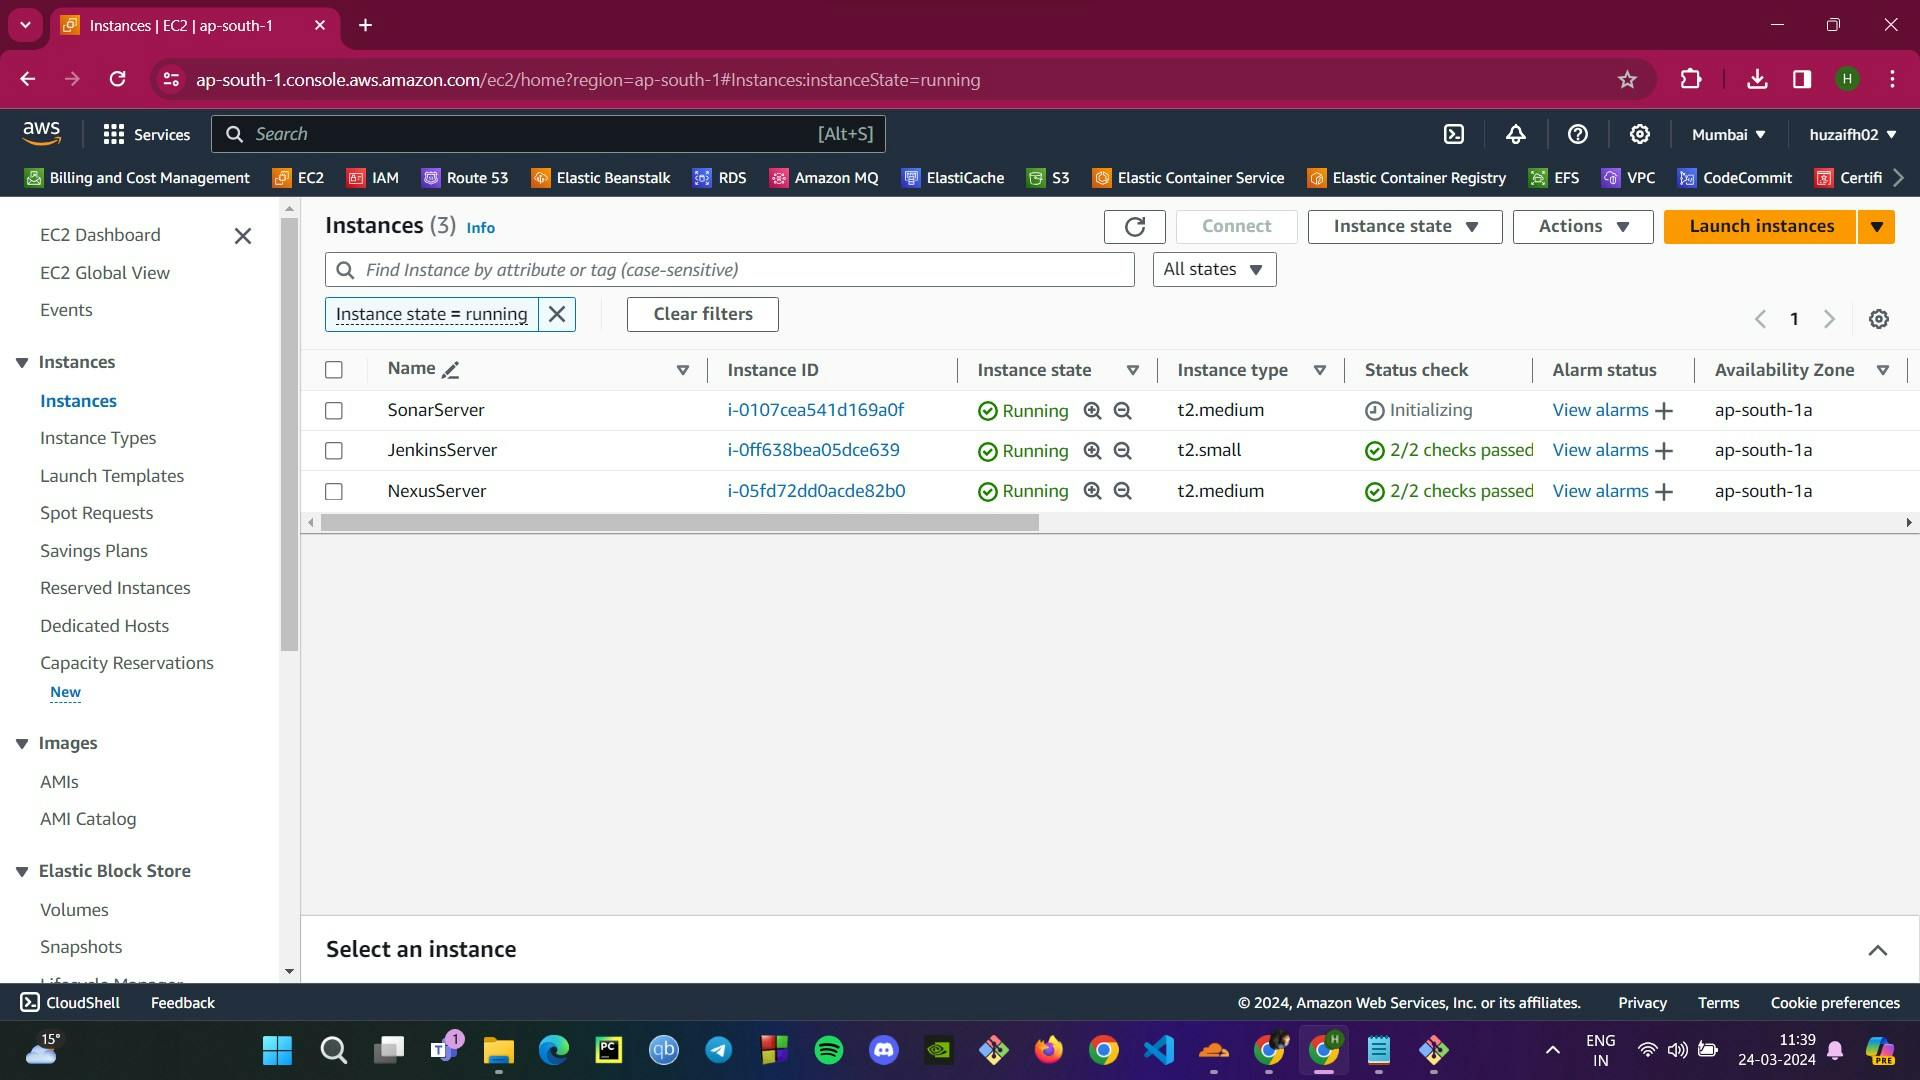
Nexus Server: For Nexus, we choose a t2.medium instance running on CentOS Stream 9, sourced from Amazon's Marketplace.
SonarQube Server: SonarQube also gets an Ubuntu 22 environment, running on a t2.medium instance.
Jenkins Post-Installation: We verify the Jenkins setup by checking the service status and Java version, ensuring everything is running smoothly.

Jenkins Initial Setup: Accessing Jenkins through its public IP, we log in to the dashboard and kickstart our pipeline by installing key plugins: Maven Integration, GitHub Integration, Nexus Artifact Uploader, SonarQube Scanner, Slack Notification, and Build Timestamp.


Nexus and SonarQube Configuration:
Nexus: Once the Nexus service is active, we log in and create repositories crucial for our workflow:
vprofile-releasefor storing our released artifacts.vpro-maven-centralas a proxy for Maven central, so Jenkins can fetch necessary dependencies.vprofile-snapshotfor snapshot artifacts.vpro-maven-groupto group these repositories, streamlining artifact management.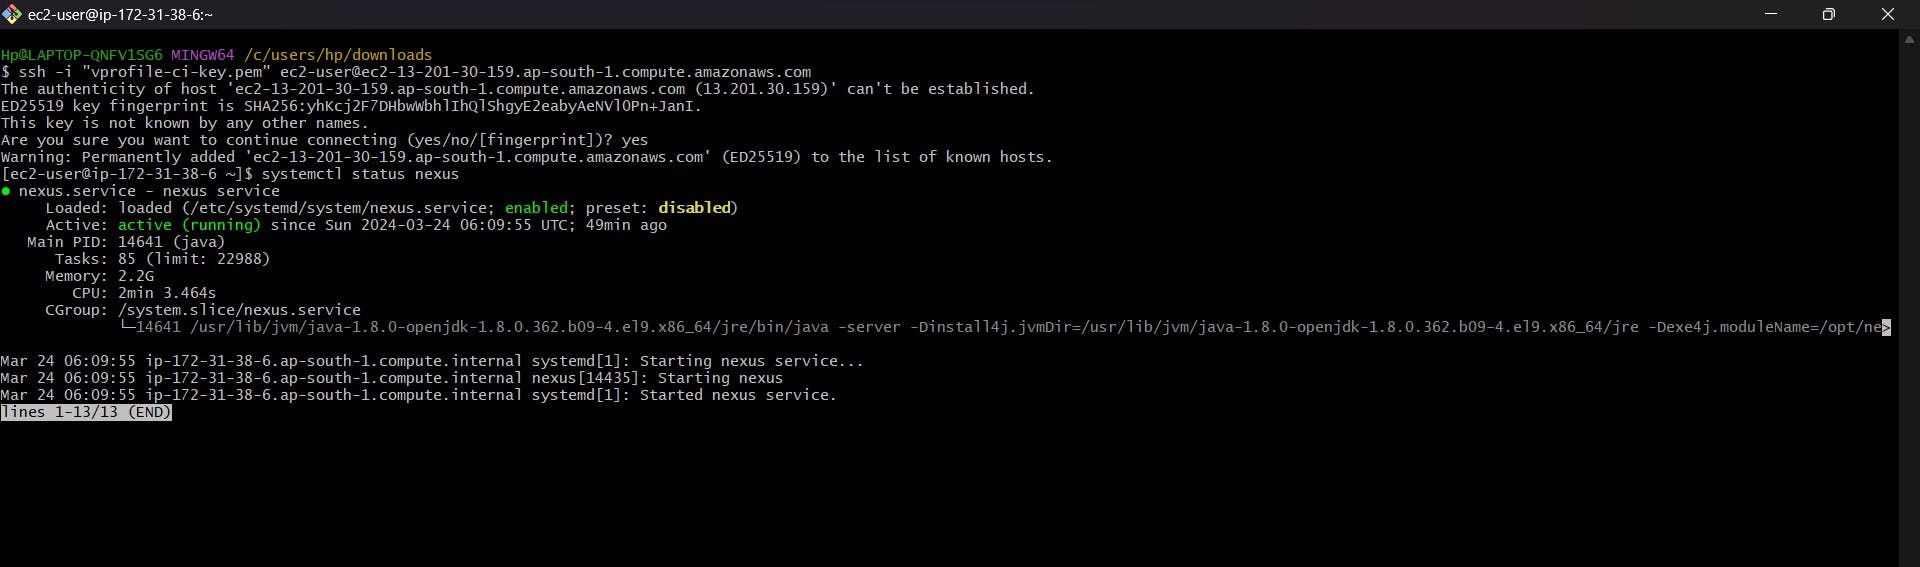


SonarQube: We ensure the SonarQube server is up, running, and ready to analyze our code quality.
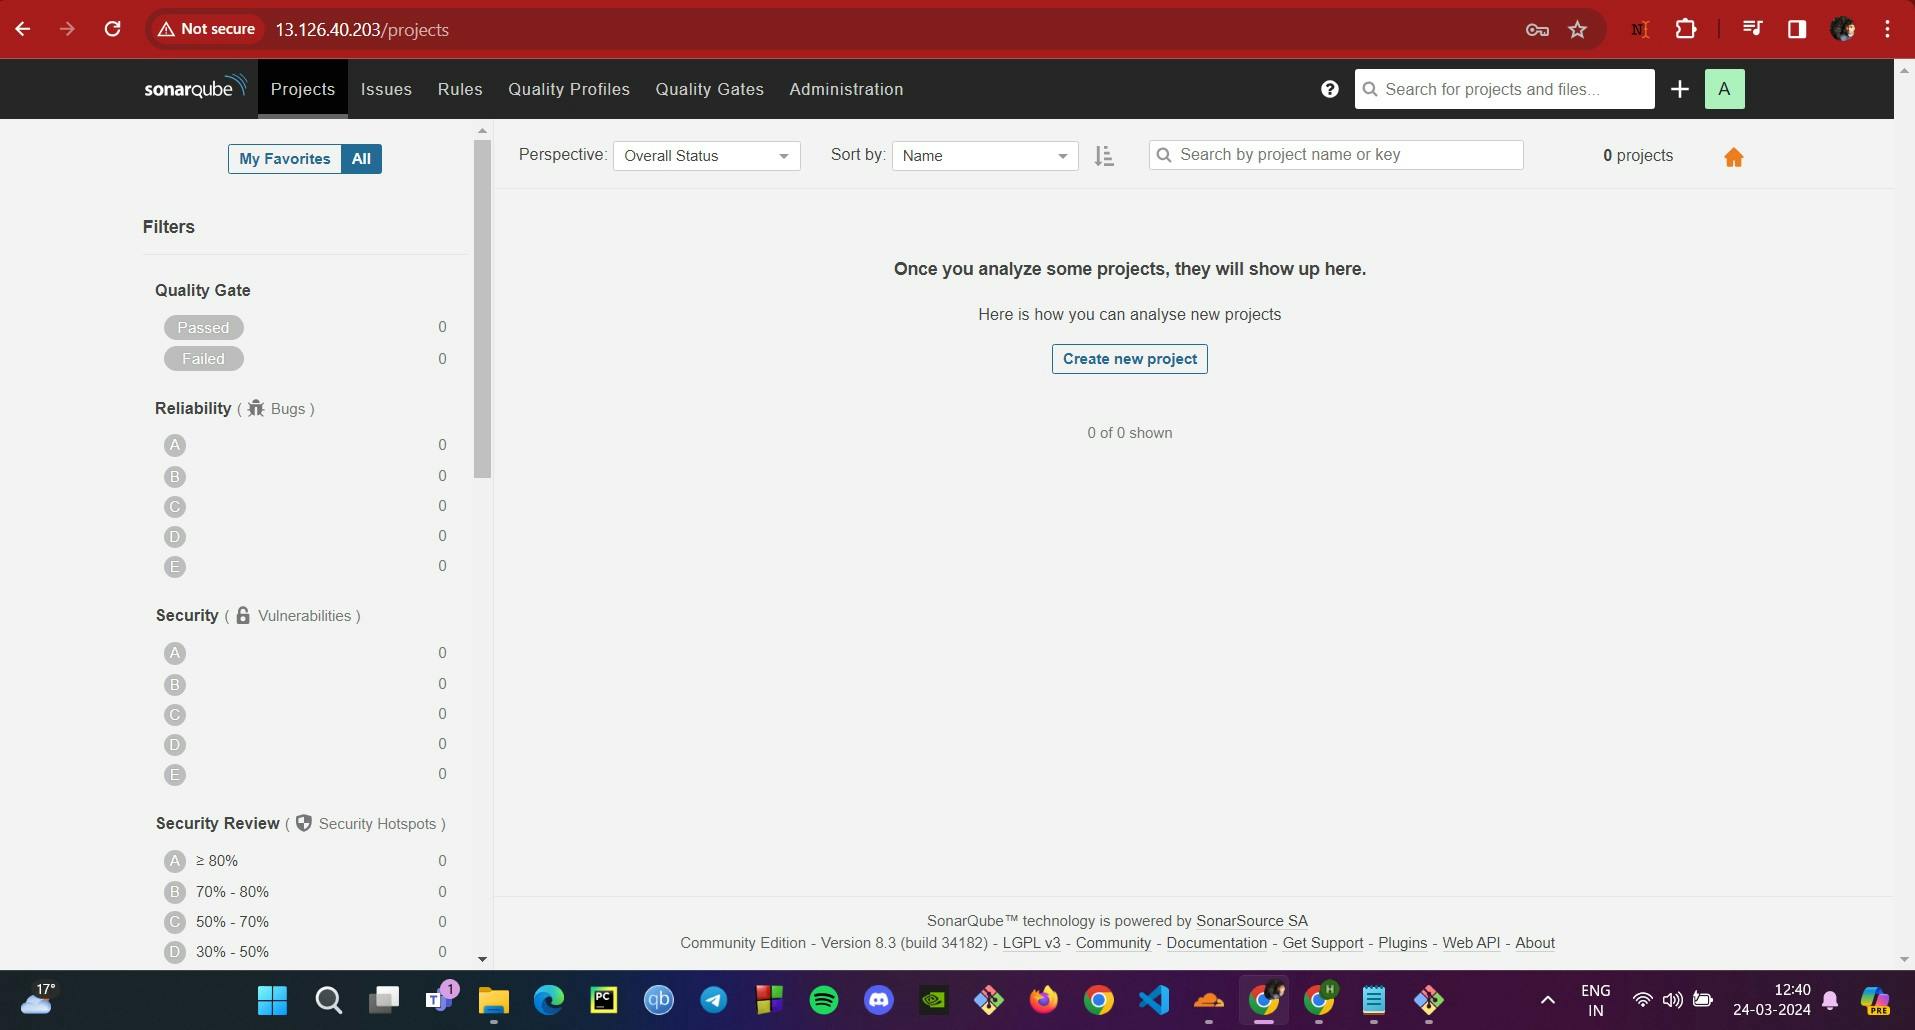
Images provided illustrate the EC2 dashboard with running instances, the Jenkins initial setup page, Nexus operational with newly created repositories, and the SonarQube ready page, each marking a successful step in our DevOps setup. Next, we'll be diving into the heart of the action: crafting the CI/CD pipeline.
Step 3: Building the Job on Jenkins
With our servers ready, we turn our attention to Jenkins, the maestro of our build process.
Setting up JDK and Maven: Inside Jenkins, we configure the tools needed for builds — JDK8 and Maven3, ensuring our build environment is equipped with the right compilers and build tools.


Credentials for Nexus: We also add Nexus credentials to Jenkins, which enables Jenkins to push and retrieve artifacts from Nexus, bridging the gap between our CI process and artifact management.

Defining the Pipeline: Next, we craft the Jenkinsfile in our source code repository. It's the script that Jenkins reads to execute the CI/CD pipeline. We define the necessary variables, including those for the
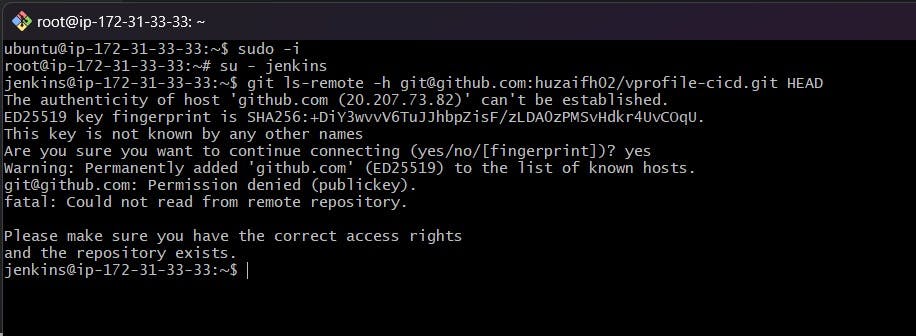
settings.xmlandpom.xmlfiles, which Maven uses to manage dependencies and project builds.pipeline { agent any tools { maven "MAVEN3" jdk "OracleJDK8" } environment { SNAP_REPO = 'vprofile-snapshot' NEXUS_USER = 'admin' NEXUS_PASS = 'admin123' RELEASE_REPO = 'vprofile-release' CENTRAL_REPO = 'vpro-maven-central' NEXUSIP = '172.31.5.4' NEXUSPORT = '8081' NEXUS_GRP_REPO = 'vpro-maven-group' NEXUS_LOGIN = 'nexuslogin' } stages { stage('Build'){ steps { sh 'mvn -s settings.xml -DskipTests install' } } } }Creating a New Item in Jenkins: In Jenkins, we create a new pipeline job by selecting 'Pipeline script from SCM' and pointing it to our git repository via SSH. This pulls in the Jenkinsfile from our repo and initializes the pipeline.
First Build: Once everything is in place, we trigger our first build. Jenkins springs into action, compiling code, running tests, and packaging our application.

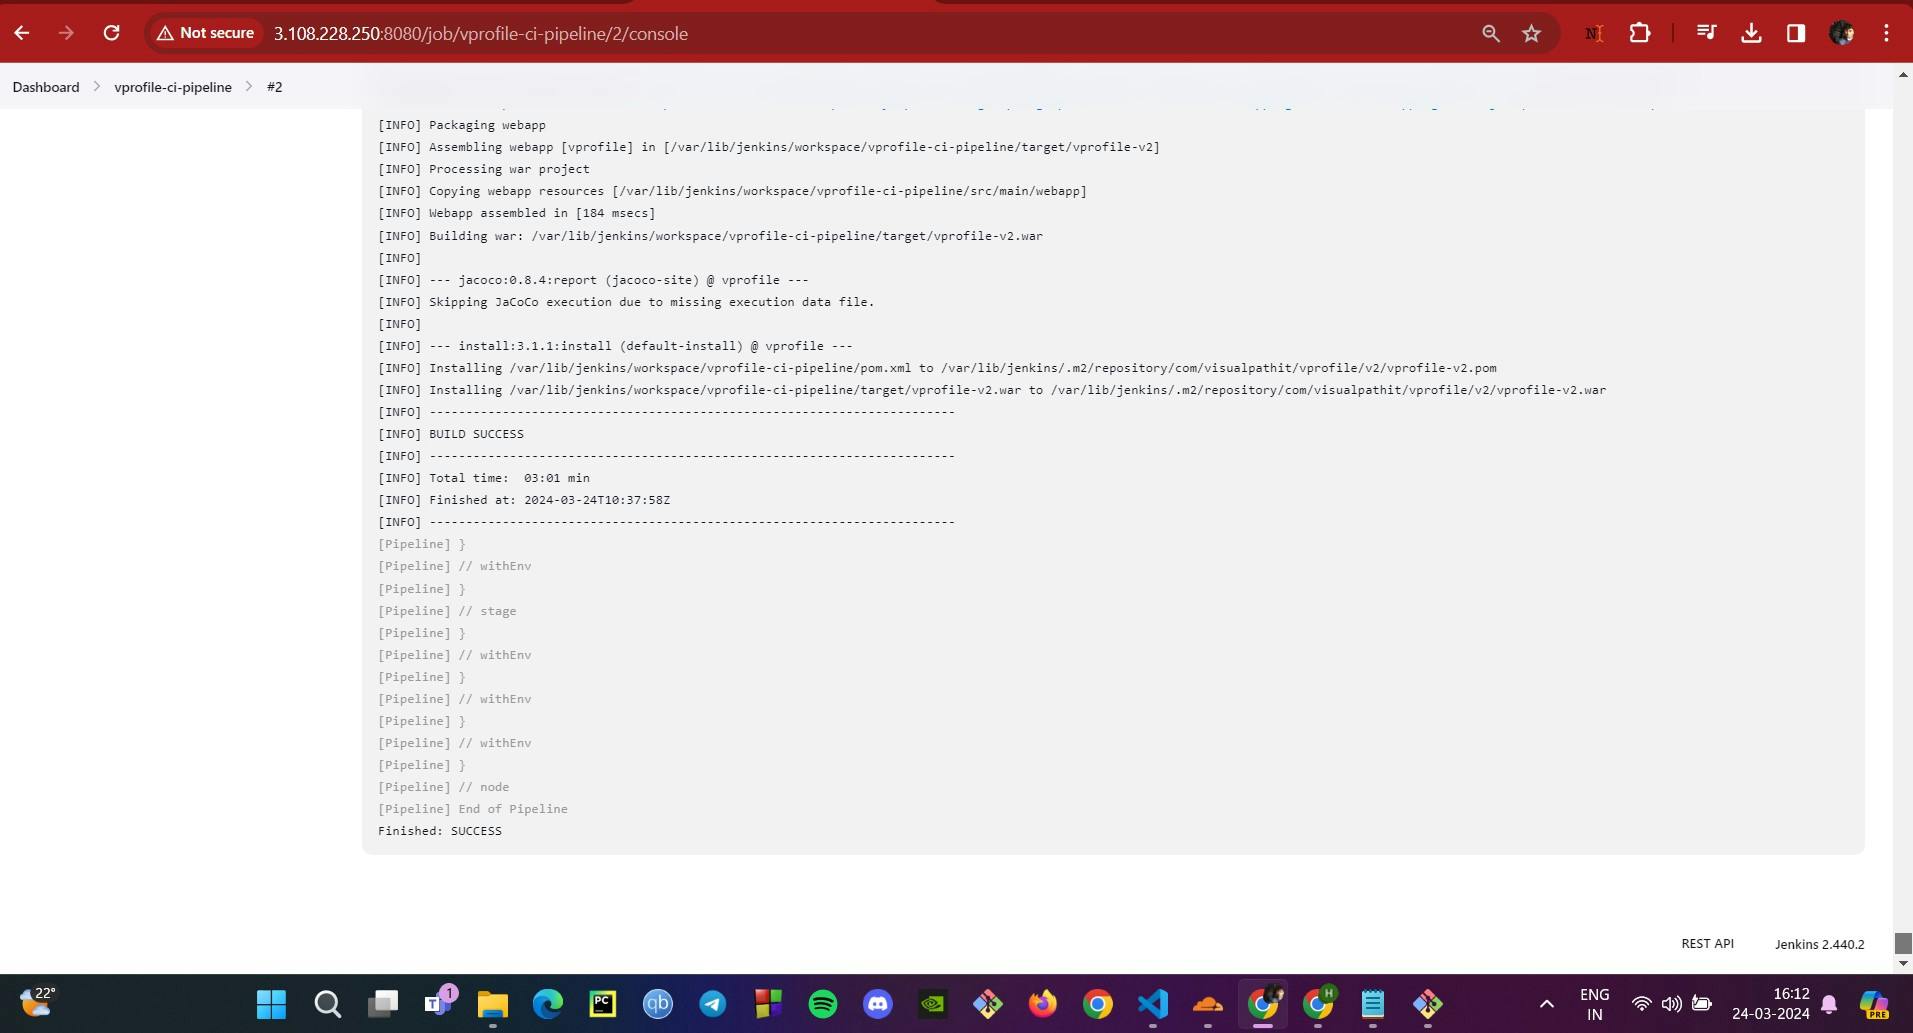
The provided images and pipeline code snippet illustrate the steps in this process, giving us a visual representation of the setup in Jenkins and the successful execution of our first build. Now, our CI pipeline is not just a plan on paper — it's a working reality.
Step 4: Automating Builds with GitHub Webhooks
Webhook Integration: To automate Jenkins builds upon each Git commit, we integrate a webhook in the GitHub repository settings, using the provided Jenkins URL followed by
/github-webhook/.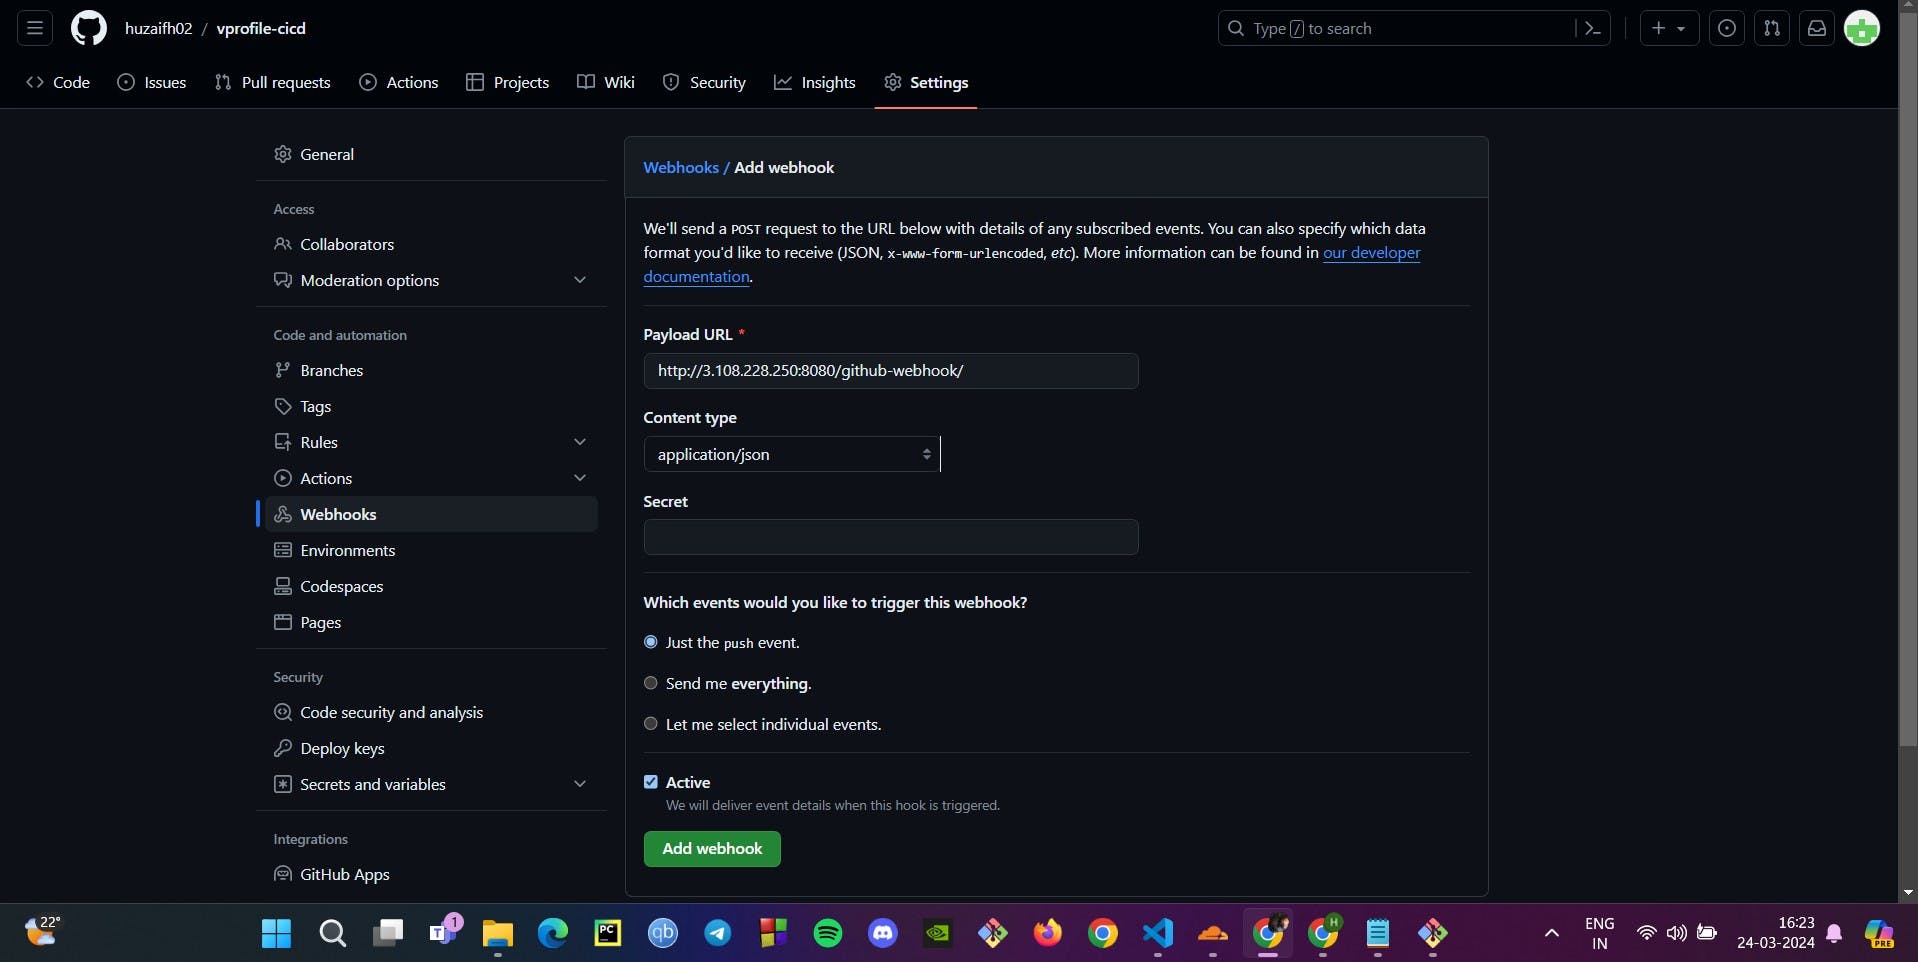
Enabling GitHub Triggers: Within the job configuration in Jenkins, we activate the build process by selecting 'GitHub hook trigger for GITScm polling'.
Pipeline Update: Our Jenkinsfile is updated to include additional stages:
Archiving Artifacts: Post successful build, artifacts are archived for future use.
Running Tests: A new test stage executes automated tests via Maven.
Checkstyle Analysis: Code style checks are performed in another stage to ensure adherence to coding standards.
  pipeline {
      agent any
      tools {
          maven "MAVEN3"
          jdk "OracleJDK8"
      }

      environment {
          SNAP_REPO = 'vprofile-snapshot'
          NEXUS_USER = 'admin'
          NEXUS_PASS = 'admin123'
          RELEASE_REPO = 'vprofile-release'
          CENTRAL_REPO = 'vpro-maven-central'
          NEXUSIP = '172.31.5.4'
          NEXUSPORT = '8081'
          NEXUS_GRP_REPO = 'vpro-maven-group'
          NEXUS_LOGIN = 'nexuslogin'
      }

      stages {
          stage('Build'){
              steps {
                  sh 'mvn -s settings.xml -DskipTests install'
              }
              post {
                  success {
                      echo "Now Archiving."
                      archiveArtifacts artifacts: '**/*.war'
                  }
              }
          }

          stage('Test'){
              steps {
                  sh 'mvn -s settings.xml test'
              }

          }

          stage('Checkstyle Analysis'){
              steps {
                  sh 'mvn -s settings.xml checkstyle:checkstyle'
              }
          }
      }
  }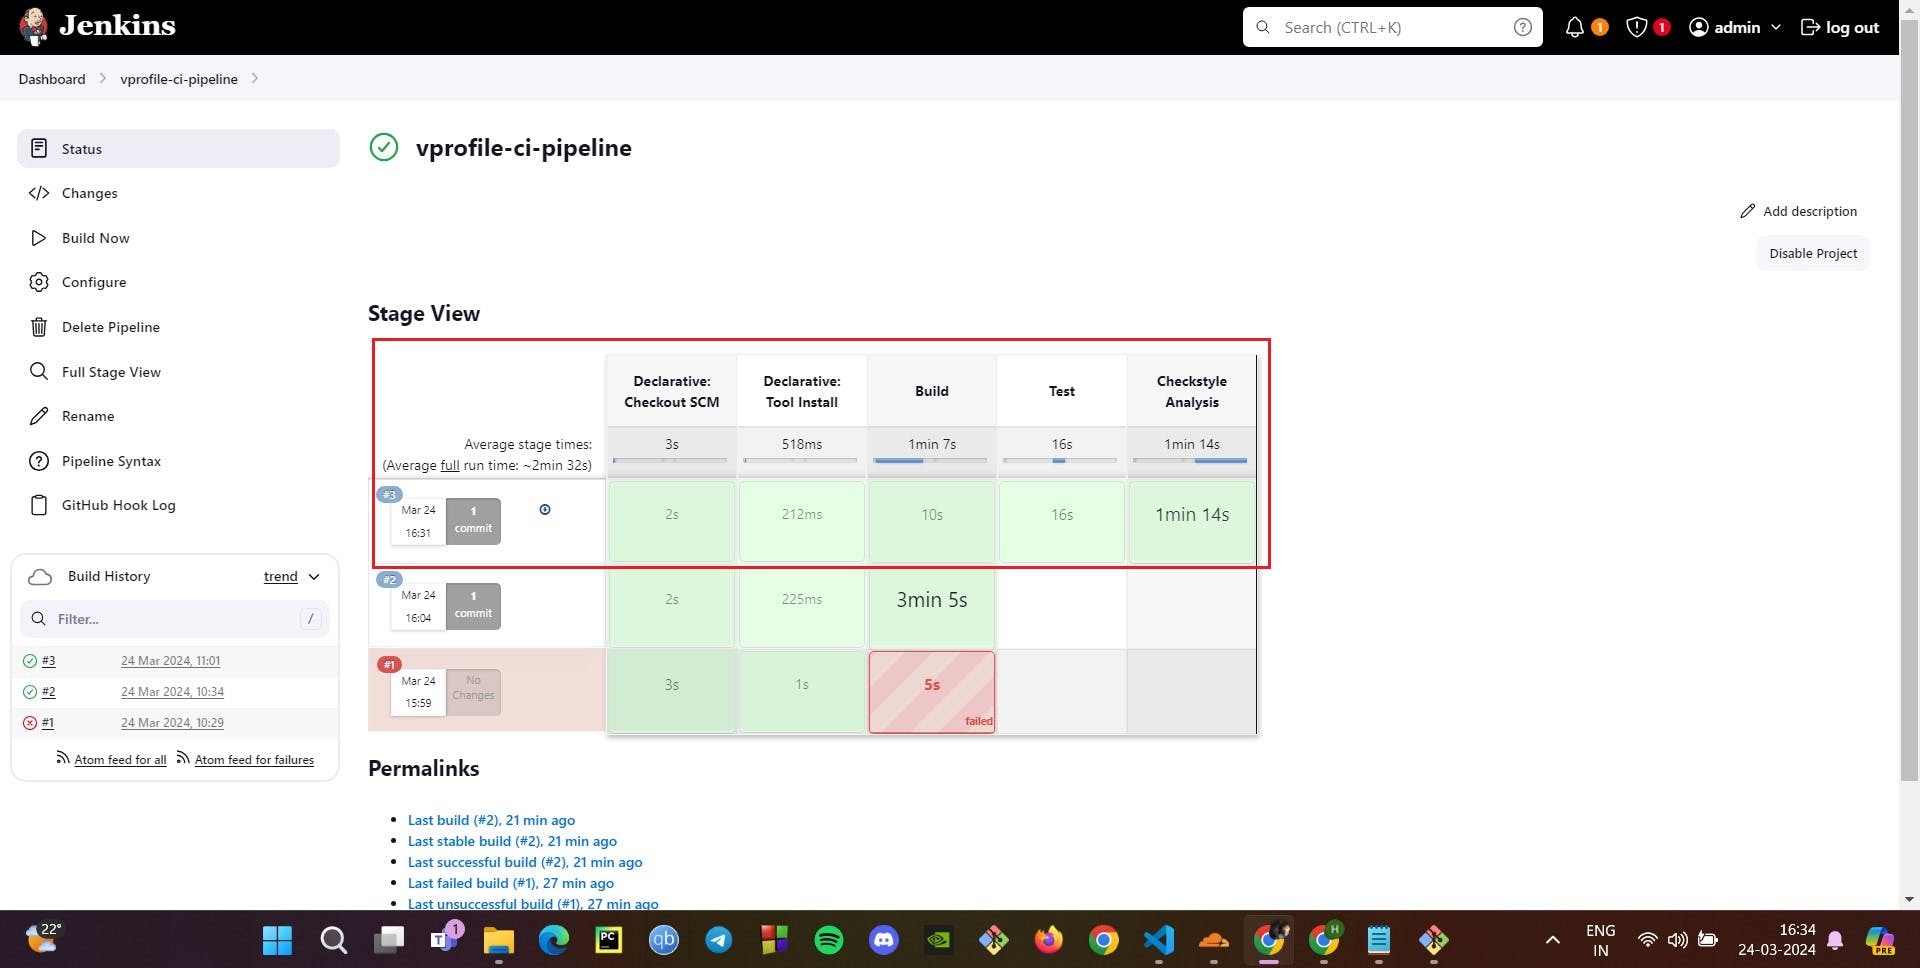
This setup ensures that every change in the repository initiates an automated build and test cycle, maintaining the integrity and quality of the codebase continuously. Images provided showcase the webhook settings in the GitHub repository and the stage view in Jenkins reflecting the updated pipeline.
Step 5: Integrating SonarQube for Code Analysis
SonarQube Scanner Tool: We add the SonarQube Scanner version 4.7 to Jenkins, allowing us to automate the code quality checks.
Configuring System Settings: In the Jenkins system configuration, we set up SonarQube using the private URL of our SonarQube server.

Authentication: A SonarQube token is used for secure communication between Jenkins and the SonarQube server.
Pipeline Stage for SonarQube: We introduce a 'Sonar Analysis' stage into our pipeline, where the SonarQube scanner analyzes the code quality upon each build.
  pipeline {
      agent any
      tools {
          maven "MAVEN3"
          jdk "OracleJDK8"
      }

      environment {
          SNAP_REPO = 'vprofile-snapshot'
          NEXUS_USER = 'admin'
          NEXUS_PASS = 'admin123'
          RELEASE_REPO = 'vprofile-release'
          CENTRAL_REPO = 'vpro-maven-central'
          NEXUSIP = '172.31.5.4'
          NEXUSPORT = '8081'
          NEXUS_GRP_REPO = 'vpro-maven-group'
          NEXUS_LOGIN = 'nexuslogin'
          SONARSERVER = 'sonarserver'
          SONARSCANNER = 'sonarscanner'
      }

      stages {
          stage('Build'){
              steps {
                  sh 'mvn -s settings.xml -DskipTests install'
              }
              post {
                  success {
                      echo "Now Archiving."
                      archiveArtifacts artifacts: '**/*.war'
                  }
              }
          }

          stage('Test'){
              steps {
                  sh 'mvn -s settings.xml test'
              }

          }

          stage('Checkstyle Analysis'){
              steps {
                  sh 'mvn -s settings.xml checkstyle:checkstyle'
              }
          }

          stage('Sonar Analysis') {
              environment {
                  scannerHome = tool "${SONARSCANNER}"
              }
              steps {
                 withSonarQubeEnv("${SONARSERVER}") {
                     sh '''${scannerHome}/bin/sonar-scanner -Dsonar.projectKey=vprofile \
                     -Dsonar.projectName=vprofile \
                     -Dsonar.projectVersion=1.0 \
                     -Dsonar.sources=src/ \
                     -Dsonar.java.binaries=target/test-classes/com/visualpathit/account/controllerTest/ \
                     -Dsonar.junit.reportsPath=target/surefire-reports/ \
                     -Dsonar.jacoco.reportsPath=target/jacoco.exec \
                     -Dsonar.java.checkstyle.reportPaths=target/checkstyle-result.xml'''
                }
              }
          }
      }
  }
The pipeline code snippet details the specific commands for the SonarQube analysis, targeting project details, source directories, and various reporting paths for comprehensive code quality checks.
The images provided should be used as references for configuring SonarQube in Jenkins and viewing the Sonar Analysis stage within the Jenkins pipeline.
Step 6: Using Quality Gates to Enforce Code Standards
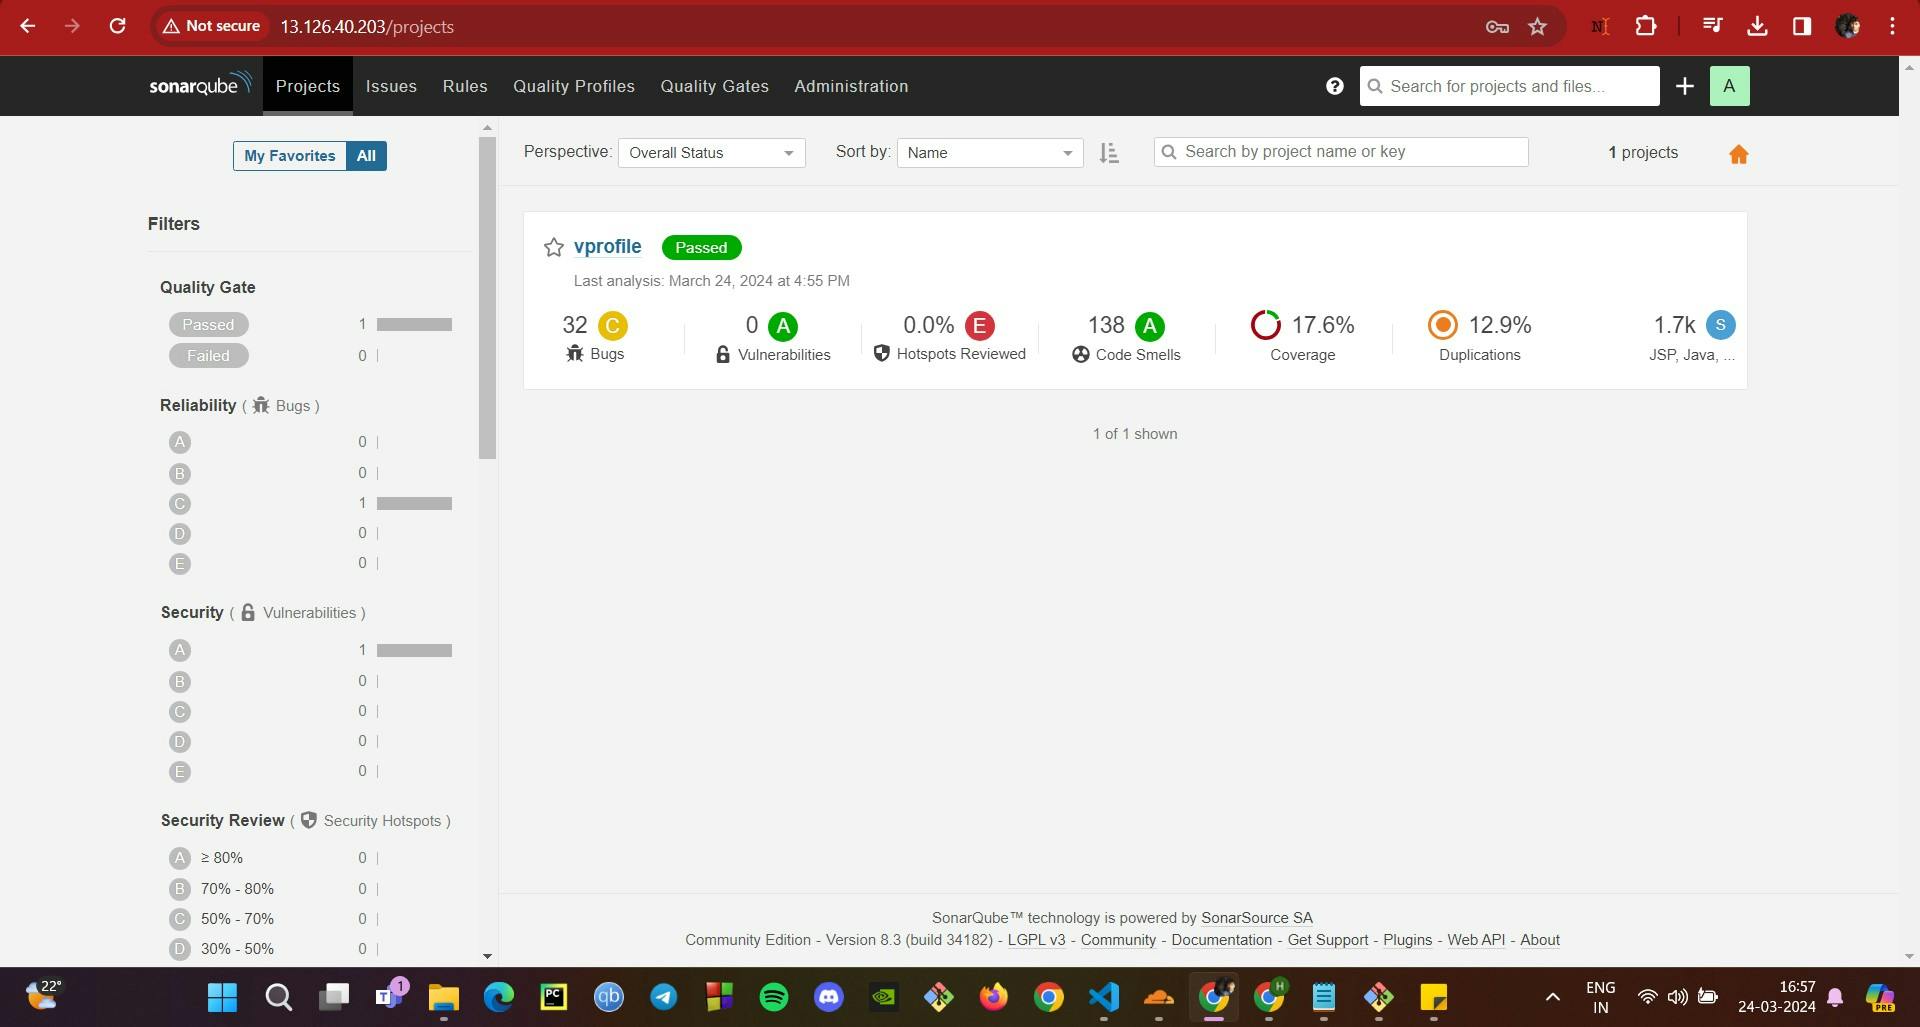
Quality Gates Configuration: We set up a Quality Gate in SonarQube to define the threshold for acceptable bugs in the codebase, using the private URL of the SonarQube server to hook it with Jenkins.

Threshold Setting: A condition is specified within the Quality Gate to fail the build if the number of bugs exceeds 25, considering that the current count is at 30.

Project Association: The Quality Gate is linked to our project in SonarQube, ensuring that the set criteria are applied to the subsequent analyses.
Pipeline Enhancement: The Jenkins pipeline is augmented with a new "Quality Gate" stage, designed to halt the build process if the code does not satisfy the predefined quality criteria.
    pipeline {
        agent any
        tools {
            maven "MAVEN3"
            jdk "OracleJDK8"
        }

        environment {
            SNAP_REPO = 'vprofile-snapshot'
            NEXUS_USER = 'admin'
            NEXUS_PASS = 'admin123'
            RELEASE_REPO = 'vprofile-release'
            CENTRAL_REPO = 'vpro-maven-central'
            NEXUSIP = '172.31.5.4'
            NEXUSPORT = '8081'
            NEXUS_GRP_REPO = 'vpro-maven-group'
            NEXUS_LOGIN = 'nexuslogin'
            SONARSERVER = 'sonarserver'
            SONARSCANNER = 'sonarscanner'
        }

        stages {
            stage('Build'){
                steps {
                    sh 'mvn -s settings.xml -DskipTests install'
                }
                post {
                    success {
                        echo "Now Archiving."
                        archiveArtifacts artifacts: '**/*.war'
                    }
                }
            }

            stage('Test'){
                steps {
                    sh 'mvn -s settings.xml test'
                }

            }

            stage('Checkstyle Analysis'){
                steps {
                    sh 'mvn -s settings.xml checkstyle:checkstyle'
                }
            }

            stage('Sonar Analysis') {
                environment {
                    scannerHome = tool "${SONARSCANNER}"
                }
                steps {
                   withSonarQubeEnv("${SONARSERVER}") {
                       sh '''${scannerHome}/bin/sonar-scanner -Dsonar.projectKey=vprofile \
                       -Dsonar.projectName=vprofile \
                       -Dsonar.projectVersion=1.0 \
                       -Dsonar.sources=src/ \
                       -Dsonar.java.binaries=target/test-classes/com/visualpathit/account/controllerTest/ \
                       -Dsonar.junit.reportsPath=target/surefire-reports/ \
                       -Dsonar.jacoco.reportsPath=target/jacoco.exec \
                       -Dsonar.java.checkstyle.reportPaths=target/checkstyle-result.xml'''
                  }
                }
            }

            stage("Quality Gate") {
                steps {
                    timeout(time: 1, unit: 'HOURS') {
                        // Parameter indicates whether to set pipeline to UNSTABLE if Quality Gate fails
                        // true = set pipeline to UNSTABLE, false = don't
                        waitForQualityGate abortPipeline: true
                    }
                }
            }


        }
    }
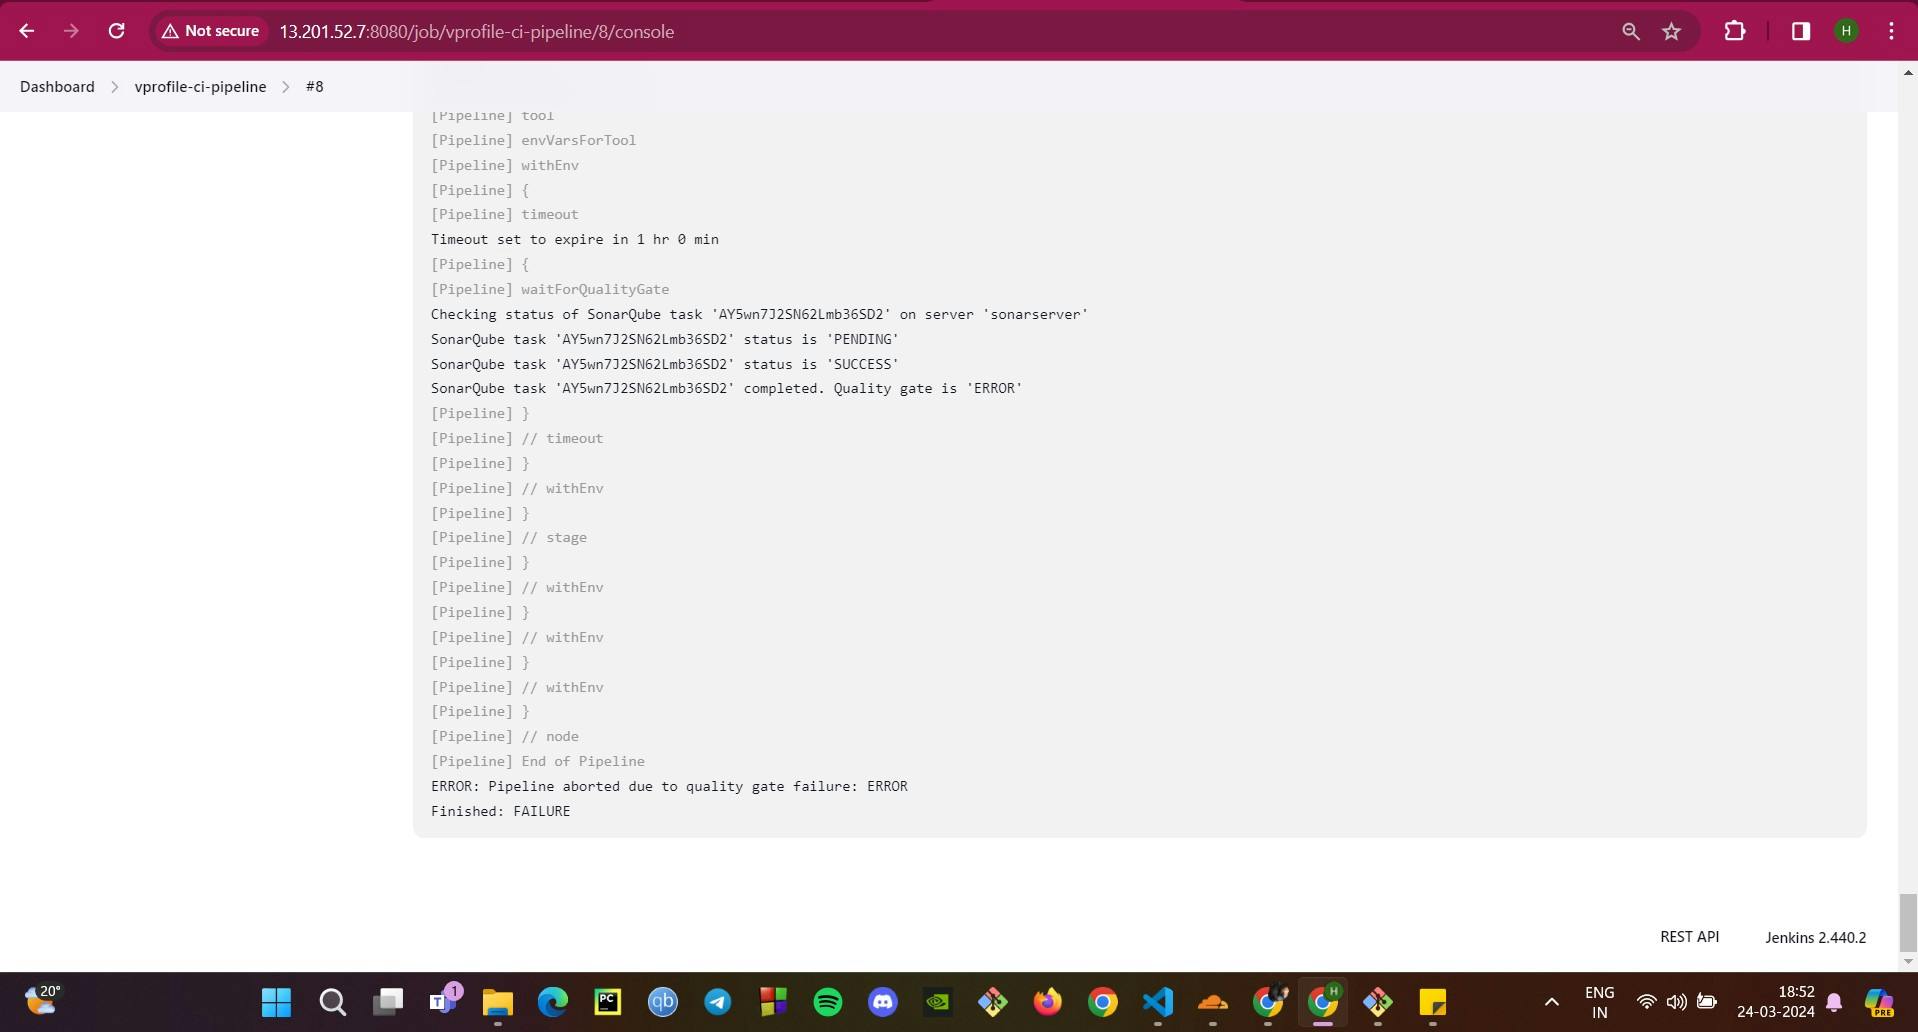
Pipeline Script Update: With the incorporation of the "Quality Gate" stage, the pipeline script is updated to include a timeout and a conditional step that waits for the Quality Gate status, aborting the pipeline if the Quality Gate fails.
Validation of Quality Gate: Changes are committed to the Git repository, triggering a new build in Jenkins, where the Quality Gate's efficacy is tested—if the number of bugs is above the set threshold, the build fails, confirming the gate's functionality.

Adjusting Threshold: To demonstrate a successful build, the Quality Gate's bug threshold is increased to 100, and upon the next build, the Quality Gate passes, showcasing its influence on the build's outcome.
We can now see the significance of incorporating Quality Gates in the CI/CD pipeline as a powerful tool to enforce code standards, prevent the progression of substandard code, and ultimately, drive the development of high-quality software projects.
Step 7: Publishing Artifact to Nexus Repository
Timestamp Configuration: Jenkins' Build Timestamp plugin, previously installed, is configured to label our artifacts with unique time-based identifiers.
Pipeline Expansion: A new 'UploadArtifact' stage is added to our Jenkinsfile, facilitating the transfer of our build outputs directly to Nexus.
  pipeline {
      agent any
      tools {
          maven "MAVEN3"
          jdk "OracleJDK8"
      }

      environment {
          SNAP_REPO = 'vprofile-snapshot'
          NEXUS_USER = 'admin'
          NEXUS_PASS = 'admin123'
          RELEASE_REPO = 'vprofile-release'
          CENTRAL_REPO = 'vpro-maven-central'
          NEXUSIP = '172.31.5.4'
          NEXUSPORT = '8081'
          NEXUS_GRP_REPO = 'vpro-maven-group'
          NEXUS_LOGIN = 'nexuslogin'
          SONARSERVER = 'sonarserver'
          SONARSCANNER = 'sonarscanner'
      }

      stages {
          stage('Build'){
              steps {
                  sh 'mvn -s settings.xml -DskipTests install'
              }
              post {
                  success {
                      echo "Now Archiving."
                      archiveArtifacts artifacts: '**/*.war'
                  }
              }
          }

          stage('Test'){
              steps {
                  sh 'mvn -s settings.xml test'
              }

          }

          stage('Checkstyle Analysis'){
              steps {
                  sh 'mvn -s settings.xml checkstyle:checkstyle'
              }
          }

          stage('Sonar Analysis') {
              environment {
                  scannerHome = tool "${SONARSCANNER}"
              }
              steps {
                 withSonarQubeEnv("${SONARSERVER}") {
                     sh '''${scannerHome}/bin/sonar-scanner -Dsonar.projectKey=vprofile \
                     -Dsonar.projectName=vprofile \
                     -Dsonar.projectVersion=1.0 \
                     -Dsonar.sources=src/ \
                     -Dsonar.java.binaries=target/test-classes/com/visualpathit/account/controllerTest/ \
                     -Dsonar.junit.reportsPath=target/surefire-reports/ \
                     -Dsonar.jacoco.reportsPath=target/jacoco.exec \
                     -Dsonar.java.checkstyle.reportPaths=target/checkstyle-result.xml'''
                }
              }
          }

          stage("Quality Gate") {
              steps {
                  timeout(time: 1, unit: 'HOURS') {
                      // Parameter indicates whether to set pipeline to UNSTABLE if Quality Gate fails
                      // true = set pipeline to UNSTABLE, false = don't
                      waitForQualityGate abortPipeline: true
                  }
              }
          }

          stage("UploadArtifact"){
              steps{
                  nexusArtifactUploader(
                    nexusVersion: 'nexus3',
                    protocol: 'http',
                    nexusUrl: "${NEXUSIP}:${NEXUSPORT}",
                    groupId: 'QA',
                    version: "${env.BUILD_ID}-${env.BUILD_TIMESTAMP}",
                    repository: "${RELEASE_REPO}",
                    credentialsId: "${NEXUS_LOGIN}",
                    artifacts: [
                      [artifactId: 'vproapp',
                       classifier: '',
                       file: 'target/vprofile-v2.war',
                       type: 'war']
                    ]
                  )
              }
          }
      }
  }
Artifact Uploading: Using the
nexusArtifactUploaderfunction, our.warfile, marked with the build ID and timestamp, is uploaded to the designated Nexus repository.Nexus Verification: We confirm the successful upload by inspecting our Nexus repository
vprofile-release, where the new artifact is now listed with its version details.
The pipeline script is updated to automate the packaging and transfer of the artifact to the Nexus repository, ensuring that every successful build is stored and versioned appropriately.
Step 8: Integrating Slack Notifications
The Jenkins app is installed on Slack and connected to our designated workspace and channel.
This integration is configured to send notifications to the Slack channel, keeping the team updated on the CI/CD pipeline’s status.
  def COLOR_MAP = [
      'SUCCESS': 'good',
      'FAILURE': 'danger',
  ]
  pipeline {
      agent any
      tools {
          maven "MAVEN3"
          jdk "OracleJDK8"
      }

      environment {
          SNAP_REPO = 'vprofile-snapshot'
          NEXUS_USER = 'admin'
          NEXUS_PASS = 'admin123'
          RELEASE_REPO = 'vprofile-release'
          CENTRAL_REPO = 'vpro-maven-central'
          NEXUSIP = '172.31.5.4'
          NEXUSPORT = '8081'
          NEXUS_GRP_REPO = 'vpro-maven-group'
          NEXUS_LOGIN = 'nexuslogin'
          SONARSERVER = 'sonarserver'
          SONARSCANNER = 'sonarscanner'
      }

      stages {
          stage('Build'){
              steps {
                  sh 'mvn -s settings.xml -DskipTests install'
              }
              post {
                  success {
                      echo "Now Archiving."
                      archiveArtifacts artifacts: '**/*.war'
                  }
              }
          }

          stage('Test'){
              steps {
                  sh 'mvn -s settings.xml test'
              }

          }

          stage('Checkstyle Analysis'){
              steps {
                  sh 'mvn -s settings.xml checkstyle:checkstyle'
              }
          }

          stage('Sonar Analysis') {
              environment {
                  scannerHome = tool "${SONARSCANNER}"
              }
              steps {
                 withSonarQubeEnv("${SONARSERVER}") {
                     sh '''${scannerHome}/bin/sonar-scanner -Dsonar.projectKey=vprofile \
                     -Dsonar.projectName=vprofile \
                     -Dsonar.projectVersion=1.0 \
                     -Dsonar.sources=src/ \
                     -Dsonar.java.binaries=target/test-classes/com/visualpathit/account/controllerTest/ \
                     -Dsonar.junit.reportsPath=target/surefire-reports/ \
                     -Dsonar.jacoco.reportsPath=target/jacoco.exec \
                     -Dsonar.java.checkstyle.reportPaths=target/checkstyle-result.xml'''
                }
              }
          }

          stage("Quality Gate") {
              steps {
                  timeout(time: 1, unit: 'HOURS') {
                      // Parameter indicates whether to set pipeline to UNSTABLE if Quality Gate fails
                      // true = set pipeline to UNSTABLE, false = don't
                      waitForQualityGate abortPipeline: true
                  }
              }
          }

          stage("UploadArtifact"){
              steps{
                  nexusArtifactUploader(
                    nexusVersion: 'nexus3',
                    protocol: 'http',
                    nexusUrl: "${NEXUSIP}:${NEXUSPORT}",
                    groupId: 'QA',
                    version: "${env.BUILD_ID}-${env.BUILD_TIMESTAMP}",
                    repository: "${RELEASE_REPO}",
                    credentialsId: "${NEXUS_LOGIN}",
                    artifacts: [
                      [artifactId: 'vproapp',
                       classifier: '',
                       file: 'target/vprofile-v2.war',
                       type: 'war']
                    ]
                  )
              }
          }

      }
      post {
          always {
              echo 'Slack Notifications.'
              slackSend channel: '#jenkinscicd',
                  color: COLOR_MAP[currentBuild.currentResult],
                  message: "*${currentBuild.currentResult}:* Job ${env.JOB_NAME} build ${env.BUILD_NUMBER} \n More info at: ${env.BUILD_URL}"
          }
      }
  }
Notifications are set up for both successful builds and failures, ensuring immediate visibility and response to the build outcomes.
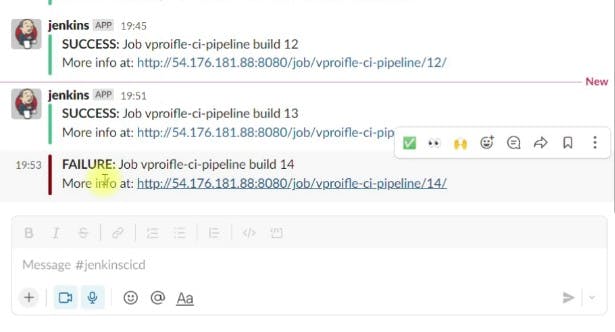
The pipeline script is enhanced to include a post-build step that sends build status notifications to Slack. This way, the team remains informed in real-time, promoting swift actions and collaboration when needed.
Project Summary: Constructing a CI/CD Pipeline
Infrastructure Setup:
EC2 Configuration: Established Jenkins, Nexus, and SonarQube servers on individual EC2 instances.
Post-Installation: Validated Jenkins functionality, configured Nexus repositories, and ensured SonarQube readiness.
Pipeline Development:
JDK and Maven: Incorporated JDK8 and Maven3 into Jenkins tools.
Credential Management: Integrated Nexus credentials within Jenkins for seamless connection and artifact management.
Code Quality and Analysis:
SonarQube Integration: Implemented SonarQube scanner to automate code quality checks.
Quality Gates: Utilized SonarQube Quality Gates to enforce coding standards.
Artifact Management:
- Nexus Repository: Configured the pipeline to archive and upload build artifacts to Nexus.
Notifications and Reporting:
- Slack Integration: Enabled Slack notifications to keep the team updated on build statuses.
This CI/CD pipeline exemplifies a comprehensive approach to software development, emphasizing automation, quality control, and team collaboration. Each tool and stage has been methodically integrated, resulting in a streamlined process that accelerates development while maintaining high standards of code quality.